
 Welcome to Triple Point Blank Fire's second After Action Report!
For those of you who have been following the action, I've basically progressed in ASLSK play to having competency in SK#1 level rules. My current opponent of choice (a.k.a "ASL-life-partner" -- a term I've shamelessly lifted from the hosts of 2 Half-Squads) is the "Prawn". What his pseudonym choice has to do with his unholy love of Sea Monkeys is up to your imagination.
The Prawn wanted a Stalingrad-type of scenario and as luck would have it, S2 War of the Rats is set in Stalingrad during September 1942. The Prawn, when he isn't making sick love to brine shrimp, is fond of the Russian way of life so he naturally wanted that side. He's a VASL screenshot of the map and the Germans and commies involved:
 The Germans must control ALL three buildings by scenario end. Control being defined by being the last player to have Good Order troops in them at any time. The Russians are seeking to prevent this.
Set-up is divided along the long diagonal (northeast-southwest) road basically. Additionally the Russians will enter along the bottom map edge (south) sometime after turn 1 based on a die roll. If you play the SK scenarios in order, you get a good progression -- S1 has basic elite squads with no Support Weapons (SW) and ELR is not an issue. S2 starts to differentiate itself with ELR (both sides have ELR 3 and can and will degrade over the course of the scenario) and SW (yay toys!). The Russians get 2 LMG and a MMG with a host of Conscript-level cowards-- sorry, comrades to start with. The reinforcements they get are first-line troops with a good leader and LMG. The Germans get Elite and first-liners with lots of LMG, a MMG, Demolition Charges and a fun Flamethrower -- but no reinforcements, they make do with what they have.
Russians set-up first and the Germans move first. Why is this critical? The Germans get the first shot (their Prep Fire) and this weighed heavily into the Prawn's intial set-up. Here's how we set up for the War of the Rats:

Key things to note here (analysis and handwringing to come later): the Russian MMG was installed in the rear building and not on a flank or Victory building. Leaders were placed with the squads holding the SWs. I additionally put the DCs and FT in the hands of leaders as well. I spread out the 5-4-8s with the increased smoke exponents of 4 (due to SSR) across the line of advance to cover everyone.
The first shot of the game had my MMG open up on the Russian leader with squad and LMG on the east flank. I anticipated massive havoc and promptly rolled crap. Very well then, the squads would have to advance on their own. Here's a shot of the first turn (the label should say north-east):
 The black acquistion counter is flipped to white to show German control (this wasn't to last more than a turn). Under heavy fire all the squads on the left flank have gone DM and routed leaving a leader pinned in the middle of the street with his DC (he wouldn't make it). The large-ish stack in the middle has a leader and two squads with a LMG and a FT. This Death Star stack would cause the Russkies a lot of difficulty in the middle.
On the whole, the FT was an MVP. It liquidated more than a few squads. The fact that it ignores TEM makes it the ideal SW in urban firefights.
On the south-west flank the approach of the other German squads was held up a little less as we were able to wrap around the buildings with smoke cover. Of note were the two conscript squads here that survived a 30FP DC attack by just breaking. They may have crapped their pants but they were still alive...
 That being said, the Russians were taking an awful lot of casualties. I think we were both being schooled on the very very distinct differences between 8-, 7-, and 6-morale troops. The Germans were DMed quite a bit but the Prawn was never able to totally finish them off. The Russian conscripts, on the other hand, seemed to do a lot of running and melting. Here's the "pile o' dead".

Fun ASL Story #1: The Prawn's MMG stacked with a 4-4-7 and 8-1 leader broke very early on and was a non-factor for a couple of turns as the hapless Russians desparately tried to unjam it. When they finally got it back on track it broke down again on the very next firing. This was a source of much loud guffawing on both sides. This will forever be known as the malfunctioning machine gun story.
Fun ASL Story #2: The Prawn's reinforcements never showed up. His die rolls were never under the turn number. As the vast number of his conscripts started to disintegrate under the German advance, the failure of the die roll at the beginning of his turns became a grotesque reminder of the failure of the Soviet system and all it stood for. The fall of the Iron Curtain could be directly traced to this tactical travesty.
 Above is a shot from about turn 3 from the Prawn's perspective. Things had started to really go sour for the Russians. The defense was basically in tatters and the conscripts were all dead or running. The Prawn really had only one functioning and defensible stack at his rear (the MMG stack) but they couldn't really do more than plink away at the southern victory building (and with my troops pulled back they couldn't even do that later).
Below is a shot of the map table as a whole. I included it to show our table set-up and how we play. On the left, we've stacked the info counters for easy access (this really speeds up play). The top of the map not involved in the scenario was our die rolling space (I have got to get me a dice tower or something). For kicks, we stacked the dead in the lower right. Just off the bottom we put the scenario card with the reinforcements and turn counter.

The piles of the dead continue to flow brown:
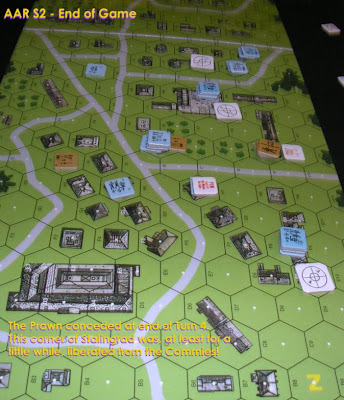
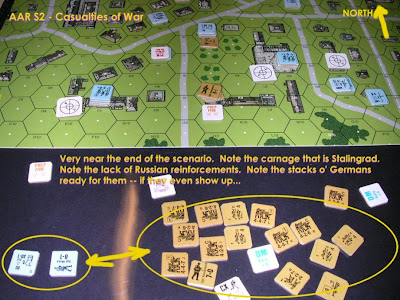 If it wasn't already clear the game was a slaughter. The Prawn conceded after about 150 minutes at the end of turn 4. He had only one stack (the losers in the rear with the very crappy MMG) and the reinforcements still hadn't shown up.
I just want you guys to note that my squads have already set-up massive defense stacks to murder the reinforcements had they even shown up the next turn!

Above: the losers cower in their broken, rubbled, dormatory for little girls.
Seriously though, I went to check out ROAR (the ASL scenario results database) after this game and I was a little surprised to see it only 63-57 for the Germans. The Prawn and I spent a good chunk of time just debriefing the firefight. He's even written up a little AAR of his own and I'll add that to mine.
The questions that arose were basically about the set-up and its effectiveness, conscript (read: crappy) morale, and the relative evenness of the die rolling and our generally good grasp of the rules (we did very little consultation of the rulebook). Should the Prawn had conceded? Was Stalin's purges having their unintended consequences? When did we have time for a rematch?
But that's for part two...

6 comments:
Not fair. He didn't tell me I had to bring my own dragon.
Prawnalov
I enjoy your AARs. Learning the ASLSKs by myself here and your blog has helped a lot. Thanks.
You're welcome!
p.s. Prawn-burgers served up well done!
Where did you get those acquisition counters. I didn't see any in my ASLSK #1.
Acquisition counters are 5/8" and either from SK2 or SK3!
This blog is awesome, like a hidden treasure just discovered. ASLSK1 is on the table before me.
Post a Comment